前阵子组装了一个主机,然后在主机上搭建了一个Linux的服务器,这里主要记录其流程和碰到的问题。
1. 安装Ubuntu Server 20.04
制作U盘启动盘并安装
- Mac系统下推荐balenaEtcher工具烧录U盘镜像。具体参考https://cto.eguidedog.net/node/826、
- 设置U盘启动并安装https://www.jianshu.com/p/da49cd69e8ff
注意Ubuntu Server版本并没有图形界面,因此后续的安装都需要键盘配合完成。
无线上网
Ubuntu Server默认没有无线客户端,需要安装一个客户端之后才能配置无线,这段时间需要先连网线上网。
- 安装wpasupplicant客户端,参考https://askubuntu.com/questions/1249160/connecting-to-personal-wifi-on-ubuntu-server-20-04
- 配置无线网和密码,https://linuxconfig.org/ubuntu-20-04-connect-to-wifi-from-command-line
完成上述两个步骤之后就可以愉快无线上网了,配置无线网的时候,注意网卡名,一般比较长,输入的时候多检查一下。
SSH上网
如果在安装的时候没有勾选ssh服务,这一步可能需要手动安装ssh后才能使用ssh,参考https://blog.csdn.net/qq_34814495/article/details/108739713
配置ssh key等内容可以参考之前的博客https://lfeng.tech/2019/09/20/Linux-VPS-configure/
其他问题
安装软件包遇到锁的问题
ubuntu未使用全部磁盘
开机等待网络连接
开机时间长,显示A start job is running for wait for network to be configured,可以设置网络连接为optional。
使用python3为默认的python
sudo apt install python-is-python3 这样当升级python后依然有效,比alias方便。
2. 外网访问家庭Ubuntu服务器
外网访问ubuntu家庭服务器的核心,就是如何找到家庭内网环境中的Ubuntu,具体来讲根据能否获取公网ip,可以分为如下两种方案:
有公网ip,对于家庭环境,可以采用路由器拨号上网,获取ip,然后设置端口转发即可。如果是非固定公网ip,可以采用ddns绑定免费域名进行访问,也可以利用dnspod等提供的api动态刷新ip来绑定顶级自定义域名。
无公网ip,需要内部ubuntu和公网的server之间建立内网穿透,实现在公网访问内部ubuntu的目的。
-商业服务:花生壳、ngrok等,主要缺点免费版本速度慢、安全性问题。
-自建服务:在一台有公网ip的机器上配置frp,和本地局域网中的ubuntu建立连接,实现内网穿透。
由于家中宽带无公网ip,以及出于安全考虑,我在利用腾讯vps配置了frp,来和本地局域网ubuntu连接,实现内网穿透。这样内网的端口就可以暴露到外网,并且可以绑定域名进行访问。
第一次登录腾讯ubuntu:先使用网页版设置root以及个人用户,账号和密码
设置root用户密码:sudo passwd root
以后切换root用户只需:su root。
如何配置frp可以参考官方git的readme,后续也会讲到。
3. 映射Http服务
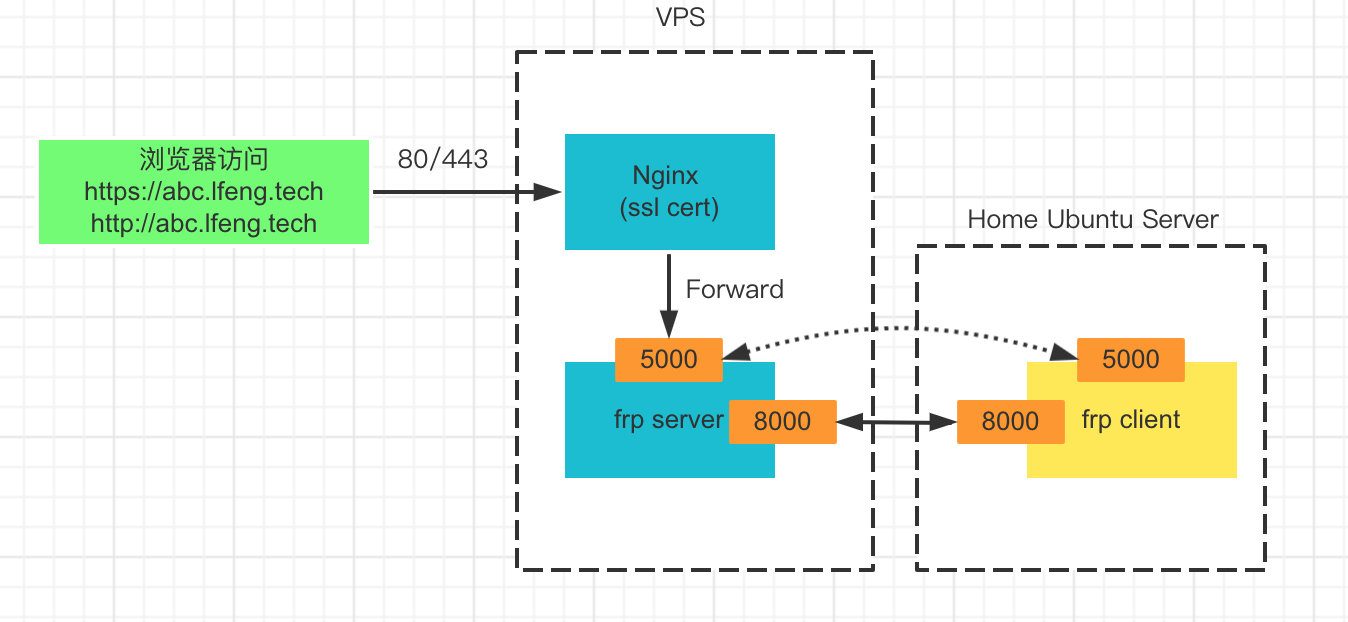
这节主要介绍如何将家庭ubuntu上的http服务暴露到公网,以下是整个原理结构。浏览器在访问域名时,nginx把80和443的请求都转发到本机的5000端口;frp运行通过8000端口与本地的ubuntu server进行通信,然后将本地的5000端口也映射到服务器的5000端口,这样通过外网就可以访问到家里的http服务了。
准备工作:
- VPS安装好Nginx,frp,绑定好对应的域名。https证书可以参考https://www.v2fy.com/p/2021-06-27-nginx-https-1624774964000/,注意可能需要切换证书服务商(acmesh issue证书问题,切换默认服务器到letsencrypt acme.sh –set-default-ca –server letsencrypt)
- Ubuntu server上同时安装好frp。
VPS端配置
配置Nginx转发
主要两个功能,一是将80同时转发到443,强制https验证。二是将443的流量转发到本地5000端口。可以新建abc.lfeng.tech.conf,填入下面内容:
1 | server { |
frp配置
编辑frps.ini并填入以下内容:
1 | [common] |
这样将ubuntu server上的5000在vps上暴露出来。
Ubuntu Server配置
ubuntu这边比较简单,不需要配置ssl证书用于https验证, 也不需要nginx,只需要配置好frpc.ini就好了。
1 | [common] |
注意需要把https和http全部配置上去,这样直接就可以通过abc.lfeng.tech来加密访问本地的5000端口上的http服务了。
Monitor
Netdata
可以使用Netdata来监控Ubuntu的性能。
安装参考:https://blog.csdn.net/oMcLin/article/details/109351611 官方文档:https://learn.netdata.cloud/docs/agent/packaging/installer/
检查 CPU 温度
Glances
设置时区: timedatectl set-timezone "Asia/Shanghai"
参考: